For all the hype about marketing your business on social networks these days, there sure seems to be a lot of confusion about how to go about it. In this post, I will guide you through setting up an official Facebook Page for your business (or brand, or public persona, etc.). Your Facebook Page is the centerpiece of your presence on Facebook, and is no less important in 2010 than your own company website.
Your Official Facebook Page is sort of like a personal profile for your business or brand on Facebook, except that Pages are treated a little differently from profiles. Most notably, people have "friends" on Facebook while Pages have "Likers." (That sounded so much less awkward when Facebook called them Fans).
Note: You should not use a "regular account" for your business. A lot of people simply create new accounts for their business using the business name in the first and last name fields because they simply don't know the difference. However Facebook treats all personal accounts with non-human-sounding names as suspect of fraud. They routinely flag and delete these accounts and often times honest business people who just didn't know any better lose their only access to the large following of "friends" they had amassed in an instant. There is no notice and no recourse. In case you've never looked, there is no 'Contact Us' link anywhere on Facebook. If this is you, please go create a Page immediately and then send a message to everyone who "friended" your personal account with a link to your new Page asking them to "Like" it.
Step 1 - Create the Page
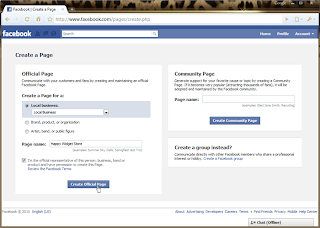
1. Go to http://www.facebook.com/pages/create.php
 http://www.facebook.com/pages/create.php
This is the magic URL you need to create an Official Page for your business. As you can see, all you really need to provide is a name for your Page (should be the same as your business name or as close as possible) and the type of business, brand, etc. your Page represents.
Enter the information, agree to the terms, and click "Create Official Page." Congratulations!!! You now have an Official Facebook Page for your business.
Step 2 - Upload Picture
By now, you should be staring at a screen that looks something like this:
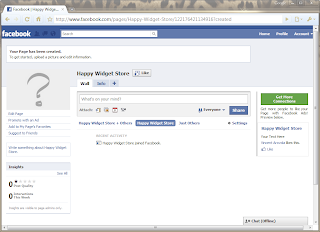
It's time to upload a photo for your Facebook Page. If you're the kind of biz owner who has one picture of your storefront or logo on your computer that you use for everything online, that will work fine. Just roll your mouse over the big "?" image where your photo goes, and you will see a link to "Change Picture." Click that, and it will allow you to upload your image file.
Tip for the Technically Inclined:If you're slightly more tech savvy and want to get creative, there are a few cool things you can do with your Page's profile picture. Many people don't realize that Facebook resizes your image based on WIDTH ONLY. That means you can make your Page look a little different from all the other Pages out there simply by using a very tall image for your profile picture. Try uploading a 120 x 600 image, and Facebook will show it at it's real size.
The other interesting thing Facebook does with photos (for Pages and personal profiles) is to crop out a perfect square version for the thumbnail image that appears next to all your posts. What you can do is design your profile picture so it is very tall BUT make sure there is a square section within it to use for your thumbnail.
Oreo cookies makes great use of this technique:
http://www.facebook.com/oreo?v=wallIf you click the Oreo link above, you'll notice they use the full height of the profile picture for branding, but designed it so that the top portion can be cropped out perfectly for the thumbnail image.
If you want to specify which section of your profile pic to use as the thumbnail, you can drag a little square into place to specify it. To do that, roll over the main profile picture on your Page until you see "Change Picture" appear. Click "Change Picture" and another menu will appear. Click "Edit Thumbnail" in that menu to change which part of your profile pic your thumbnail comes from.
Step 3 - Enter Business Info
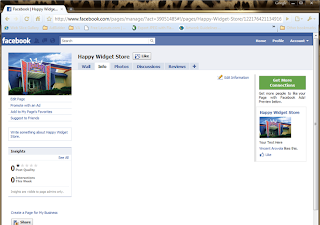
To enter your business information, click on the "Info" tab at the top of your Page. The tab should be empty at first as in the screenshot above. You should see a link to "Edit Information" in the top-right corner. Click this link to see options for editing your business information.
Which fields you see here depends on what type of business you entered for yourself when you first created the Page. For instance, if you are a restaurant, they will ask you about your hours and parking. If you're a politician, they will ask you other questions.
Put some thought into your answers to any open questions like "Description" or "About Us" on your info tab. This is the kind of thing you will write and then forget it's there once you get into the groove of posting status updates later. But new customers, Likers, and referrals will still read your Info tab every day even after it moves to the back of your mind so be sure it represents your brand well.
Step 4 - Remove Other Tabs (for now)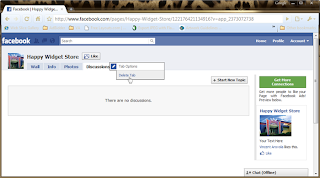
Only the Wall and Info tabs are required on your Page. You cannot delete these two tabs, and you cannot move them around. However, all other tabs can be deleted, and also dragged around to change the order.
Facebook sometimes adds other tabs by default (such as Photos, Discussions, etc) when you first create your Page. However, these tabs can clutter your Page if you don't actually post content to them regularly, so I recommend you delete all tabs (except for Wall and Info) first, and then come back and add the ones you really want later when you're ready to put content on them.
Or at least look at what Facebook put up there, and err on the side of deleting if you're not sure how you'll use it.
To delete a tab, click on it to go to that tab. The active tab (that is, the one you're on) will have a little pencil icon next to the name in the tab itself (see image at the top of this step). Click the pencil, and you will see a link to Delete Tab. Make it so.
Step 5 - Add Back the Tabs You Want
At this point, your Page should look something like this:
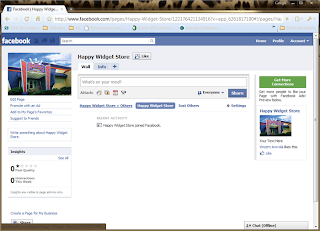
Now it's time to edit your Page settings. People are always scared of things that say "Edit Settings," but don't worry - you can keep most of the default settings. This is where we go to add built-in tabs, including possibly some of the ones we just deleted.
Click the "Edit Page" link beneath your profile picture. You should see this page:
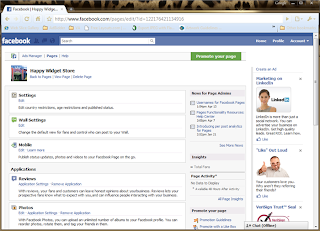
Scroll down past the Settings, Wall Settings, and Mobile Settings. If you're curious, look at the options they give you. The default settings are probably fine.
Beneath the settings, you will find a list of Facebook apps that have tabs you can add to your Page.
Tabs you may want to include are:
Photos - This really depends on your type of business. If you have photos - especially product photos - by all means add the Photos application and tab. You may also want to scroll back up to Wall Settings and disallow Likers from posting photos to your Page. If you don't have photos to upload right now today, I would wait until you have them to add the tab. It's disappointing for users to click the tab if there are no photos to see when it loads, so better to wait and add the tab later.
Video - Video is extremely powerful on the web and even more so on Facebook. My opinion however is that the Video tab is not the best place for video on your Facebook Page - I personally prefer custom landing pages with embedded YouTube videos for strongest impact - but the Video tab is certainly easier than a custom landing page. The Video tab is free and you can upload videos to Facebook. The custom tab costs time if you're technical and money if you're not.
Reviews - If you want to let your customers leave reviews on your Facebook Page, enable this tab. You cannot remove individual reviews if you disagree with something one person posts, but you can remove the tab later if you feel it does not serve you well.
Discussions - Depending on your business, the Discussions tab can be a great tool to keep people coming back to your Page. If your business serves a niche market, or sells specialized type of products like a sporting goods or fabric, then Discussions of relevant topics can be very engaging. Don't make the topics all about you specifically. Instead think of what types of things your customers are interested in that are related to your business, and discuss those. If you're a sporting goods store, discuss sports. If you're a fabric store, discuss sewing.
Static FBML - If you are not a coder, this tab is not for you. Skip to step 6. :)
If you know HTML however, you can use Facebook's Static FBML app to add web pages to your Facebook Page (and personal profile for that matter) as custom tabs. If you're very technical - especially if you're a Facebook application developer - you will be happy to know you can also use Facebook's proprietary FBML and FBJS languages on your custom tabs to integrate with their system. As far as I know, there is no way to use the platform API to query Facebook from Static FBML however. But if you're using platform API to create custom apps, you don't need Static FBML anyway.
Step 6 - (Optional) 3rd Party Application Tabs
Although your Page is the centerpiece of your business' presence on the site, Facebook offers fairly limited options for customizing the Page unless you are somewhat technical or have a tech team available to you. However, there are several 3rd-party apps available that provide various types of functionality for you to look into without paying the expense of a custom tab.
I will take this opportunity to plug one inexpensive tool that I am partial to here because (1) I built the app and (2) I designed it especially to help small businesses and entrepreneurs take advantage of all that Facebook has to offer in terms of getting referrals.
<plug>
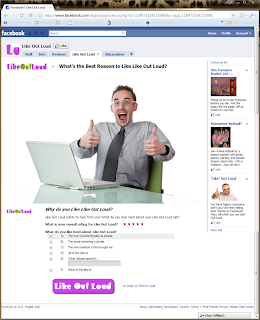
Like-Out-Loud is a custom tab you can add to your Page for $44 to maximize referrals from existing happy customers who Like you on Facebook. I find this is a missing link for a lot of businesses who understand that word-of-mouth advertising is "supposed to" flourish on Facebook, but don't know how to get the engine started. Like-Out-Loud bridges that gap by getting customers and Likers of your Page to actually spread the word about you. That is, afterall, what social marketing is really all about. Your job is just to send your happy customers to your Facebook Page right after you serve them when they are happiest with you, and Like-Out-Loud will do the rest.
</plug>
Step 7 - Promote Your Page
This is arguably the most important, and most overlooked step in establishing your Facebook presence. Creating your Page is just the beginning - not the end - of your social marketing efforts. It's true, a few people will probably find your Page eventually by searching for it after doing business with you. However, you should actively promote it to get the most out of your presence on Facebook.
There are a lot of ways to go about growing your fan base (er "Liker" base). There's lots you can do for free, and even more you can do for a comparatively small investment. The most important thing is just to start letting your customers know you're on Facebook and ask them to visit your Page. If I could offer you a window decal I would.
Finally, you will also want to visit your own Page regularly to post status updates. Don't take the term "Status Update" too literally here. You can really post anything you think will be interesting to your Likers. This is the most powerful tool you have to stay current in your Likers' minds. Anything you post to your own Page automatically appears as if posted by the Page itself as opposed to your personal profile, and it appears in the newsfeeds of all your Likers (unless they unsubscribed from you).
Example: If you operate a sandwich shop in or near an office complex, 11:45am would be a really really good time to post a picture of your daily special to Facebook. Why? Because your Likers probably work at the office complex, and they are probably logging on to check Facebook while they kill 15 minutes before leaving for lunch. Couple that with a promotion to build your Liker base - post your favorite sandwich on our Facebook Page for a chance to win a free sandwich - and you've got a recipe for success.
I hope you've found this blog helpful. If so, please leave a comment and/or re-post it!


